Introduction
The aim is to create a working analog clock using Scratch 2, so the Scratch environment will end up looking like Figure 1.
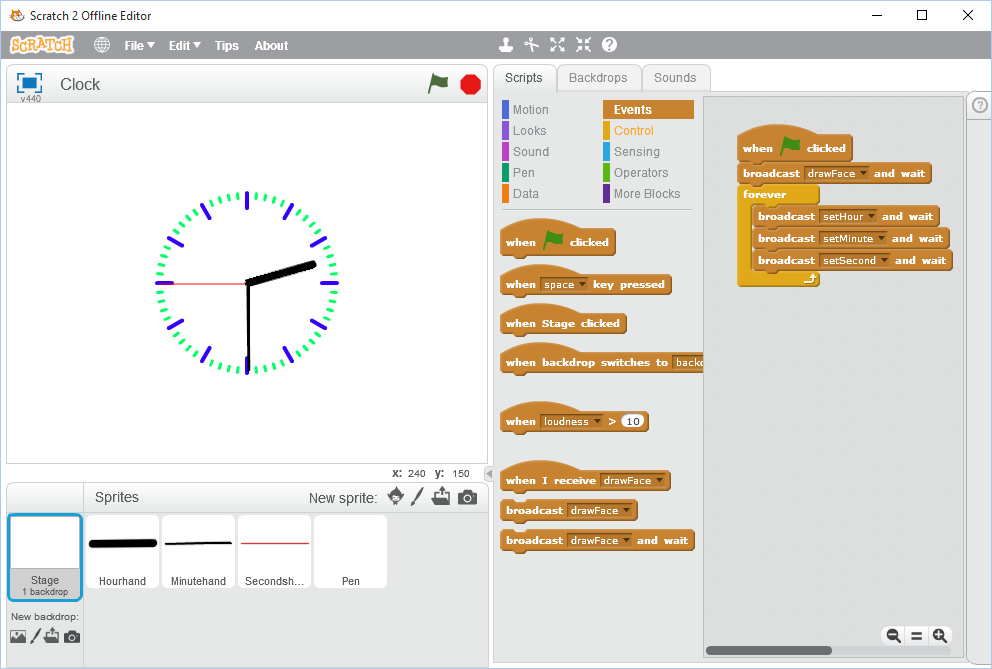
The aim is to create a working analog clock using Scratch 2, so the Scratch environment will end up looking like Figure 1.

This is a short video recording. It is not a program so it will not show the correct time.
We can start the app from the Stage with the usual “when green flag clicked” code block from the Events palette. Then we have to draw the clock face. We can’t do this from the stage. We have to ask some other sprite to draw on the stage. So the next code block is to broadcast a message to draw the clock face. We get this from the Events palette and edit the message name to drawFace – by clicking the drop down arrow and editing a new message. We will, of course, have to create a sprite to receive the message and do the drawing.
Then we have to run the clock. This is done in a forever loop that does not stop until the app is stopped. It continually broadcasts messages to set the hour, minute and second. Each time it does this the current time will be read from the computer clock and the display will be updated.
This means dragging three copies of the broadcast block from the Events palette and editing the message names appropriately. We are going to receive these messages in the hand sprites which will then set themselves to the correct time. These too still have to be created and coded.
So the complete Stage script is as shown in figure 2.

We start by going to the New sprite toolbar below the stage and click on the paint brush icon to opt for “paint a new sprite”. This action creates a new Sprite1 in the pane below (unless you forgot to delete the initial Sprite1). Right click on the Sprite1 and select info. This opens a panel in which you can edit the name to Hourhand instead of Sprite1. It is always a good idea to name our sprite informatively. Click the left arrow button to return to the previous scene where the sprite is now called Hourhand.
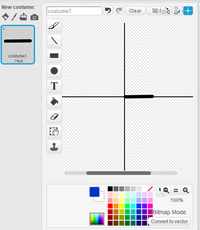
Now you will see that the Hourhand sprite is also displayed in the scripting pane with the Costumes tab selected. This shows costume1 and since you are only going to need one costume, you may as well just use this name. So in the paint pane on the right you have to draw an hour hand. The simplest costume is just a single, rather thick line, so select the line tool and adjust the thickness at the bottom of the pane and draw a single thick black line, as in Figure 3. Of course, you can change the color or the design any way you want.
There is one complication in that we want the hand to be centered on a clock face and rotate abut one end, so we need to define the center of the sprite. To do this we click the crosshair symbol on the paint screen and this opens a pair of crossed lines which should be moved to the left edge of the hour hand line. This will be its center of rotation.
Now we have to repeat the process to get two more sprites, for the Minutehand and the Secondshand. In this example, they are just single black and red lines, both thinner and longer than the hour hand.
You may be wondering how long these lines should be. Well they should be long enough to fit on the clock face which we have yet to draw. So it is likely that we will return to these costumes and edit them to fit. However, while we are drawing the sprites they are appearing on the stage so we should have a rough idea of their relative sizes. Anyway, we now have three new sprites to represent the three hands of our clock.
Now we should go ahead and write some code to draw a clock face. For this we need a new sprite so we create another new sprite and call it Pen. This time there is no costume. It is a blank sprite that is only used for drawing. It has to respond to the drawFace message broadcast from the Stage when the app is run. So its script starts with a “when I receive drawFace” block again, from the Events palette. Then it draws the clock face in the script shown in Figure 4.
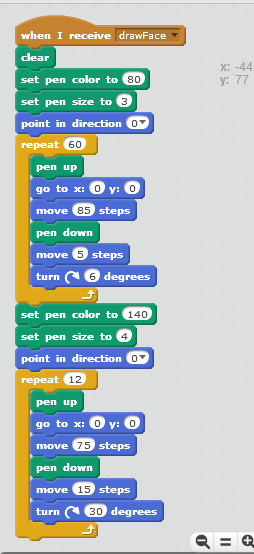
The script starts by clearing any residual drawings then sets the pen color to 80 and the pen size to 3, both values obtained by trial and error. However, you might think that the block “set pen color to square” might have been a more obvious choice to select a color since this allows the programmer to simply click on the square and select a color from a color picker. We have used the more difficult alternative block to “set pen color to number” because of a bug in Scratch 2.
The Scratch 2 offline package has a bug that means the color picker is not displayed when the programmer clicks on the color square in the “set pen color to square” code block. You can only select from those colors already displayed on the screen, which is a very limited choice. So we use the alternative code to set the color to a number. The numbers range from 0 to 200 and cycle through a spectrum from red through yellow, green, blue and magenta to red again. You can discover the exact colors by trial and error. Here we find that 80 is green and 140 is blue. So the outcome is as shown in Figure 4.
In the rest of the Pen script, the pen is set to point in the direction 0, which is straight up, then a couple of loops are executed to draw the minute marks then the hour marks on the clock face. So the first loop is a repeat 60 loop and the second is a repeat 12 loop.
In the first loop the pen is raised up so that it will not draw then moved to the center of the display at x=0 and y=0 then (still pointing to 0). Then it is moved 85 steps in that direction. Now the pen is lowered down onto the drawing surface and in the next statement draws a short line 5 steps long and finally turns clockwise by 6 degrees ready for the next iteration when it returns to the center and draws another minute mark and so on round the clock face. So it draws a total of 60 short minute marks each 5 steps long.
In the second loop the same process is executed but for only 12 iterations and each mark is thicker and longer to represent the hour marks. We also change the color to 140 which turns out to be blue. Hence, the output shown in figure 5.
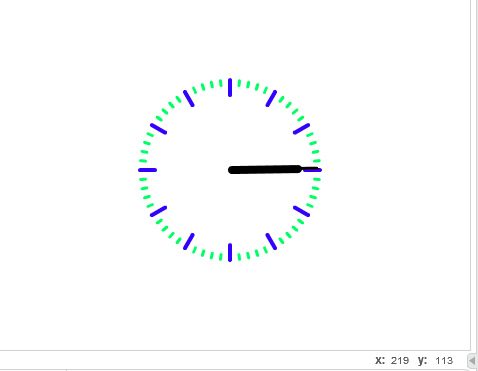
Figure 5 shows the newly drawn clock face and the three hand sprites. However, the hands are not where they should be so we have to write some code to position them on the clock face. We need to do this in the hand sprites. In effect we ask them to draw themselves.
So we have to write some scripts for each of the hands to move them to the center of the display. Each hand should have a green flag block to run the script when the app is run and all it does is move the hand to its starting position. Then it can be rotated in a second script to keep up with the time signal. We will write these scripts later. Meanwhile the setup scripts are all of the form
When green flag is clicked
Go to x:0 y:0
Then we have to write the scripts that will move the hands to their correct positions to show the current time. So each hand has a second script to do this every time the set hand message is received from the stage script. This ensures the hands are continually repositioned to show the current time.
This second script starts with a “when I receive set message” block, where the set message will be setHour, setMinute or setSecond for the respective hands. Then it has one more block to point it in the right direction. For the minute hand, this would be based on a “point in direction” block from the Motion palette. In the data box we drag a multiplication block from the Operators palette and in the first box of this we drag a “current minute” block from the Events palette. Then we end by typing a 6 into the remaining box. So the Minutehand scripts look like Figure 6.
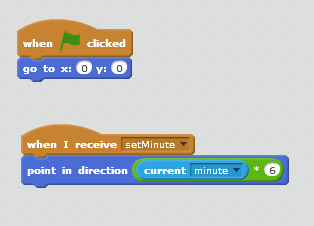
The value of current minute is returned from the system clock as a number from 0 to 60. To convert this to an angle in degrees we have to multiply by 6. So 15 minutes, for example, would convert to 90 degrees, which is exactly what we want. Fortunately, Scratch angles are measured clockwise from the top position so this angle is the same as on a clock.
We can add similar scripts to the Hourhand and Secondshand sprites. The Secondhand scripts are exactly the same as the Minutehand ones except for “current second” replacing the “current minute” event. The Hourhand script could also be similar, with “current hour” and a multiplier of 30 to convert hours to angles. However, there is a further refinement that could be added here. This is to account for the fact that the exact position of the hour hand is not just to the hour angle but should add something to move it on towards the next hour mark. This increment is the fraction of an hour given by the minute value divided by 2. So if it is half past three the hour hand will go to 90 degrees plus half of 30 degrees which is 15 degrees and halfway to the 4 o’clock position.
So the hour hand should “point in direction (current hour) * 30) + (current minute)/2”.
That’s it. When you run the app the working clock will be displayed as in the short video clip above.
This is a very basic clock and there are many improvements you might consider to create your own version. You can change the colors and the hand designs, you can add tick sound to each movement of the seconds hand. You might even draw a colored clock face to add behind the markings. Think about it.